Creating fictional CF without modifying the headshape

Patchmaking tutorials for NBA 2K13.

Creating fictional CF without modifying the headshape

Postby pierralban on Wed May 29, 2013 2:10 am

To create fictional cyberfaces quickly without modifying the headshape, here is how i do :

- Choose the player's headshape you are going to use for your fictional face.
Here I took Dick Barnett's headshape of the 71-72 Knicks.


Image

- Open modify player, then go to the turbo training editor to find the cf ID of the player.
Here it was "1921".

-Go to your 2k13 folder and find png(number of the ID of the player you want).iff and copy and paste it somewhere.
I took png1921 in 2k13 folder and copied and pasted it somewhere.

- Then choose the player's texture you are going to use as a base for your fictional face.
Here I took Kevin Murphy of the Utah Jazz.


Image

- Open modify player, then go to the turbo training editor to find the cf ID of the player.
Here it was "2490".

-Go to your 2k13 folder and find png(number of the ID of the player you want).iff and copy and paste it somewhere.
I took png2490 in 2k13 folder and copied and pasted it somewhere.

Open your copies of your two players .iff with "3DM NBA2K Mod".
Save the face texture, the arms texture, the green texture and the small white texture for both players somewhere.


Image

- Then open both faces textures with photoshop. Take the player you want to use the texture of, copy it and paste it on the other player texture.
I did take Kevin Murphy's texture and pasted it on Dick Barnett's texture.
Then start modifying it the texture the way you want, you can make scars, tattoos, add beard, take the nose of another player for example.
Here's Kevin Murphy's texture with some beard and a modified nose.


Image

- Continue to modify until you are satisfied.
Here is my final texture for this player.


Image

- Save your texture in DDS format (DXT5).
- If you modified the arms as well, it's DDS format (DXT1 no alpha).

-Return to 3DM NBA2K Mod and extract your modified textures and the player you want the headshape of. And save.
I did extract my textures on png1921.

- Rename the png####.iff of your player to an unused one like png4550. Then drop it on your 2k13 folder.

-Go back to the game and modify a player of your draft class.
Open the turbo trainer again and modify the values of CF ID, Player ID and Portrait ID with the number you assigned to your .iff
Don't forget to tick 'Use CF" and save.

-Go back to the game and save the player you were modifying.
Open "Modify this player" again and he should have a CF.
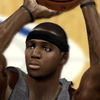
That's my player :


Image

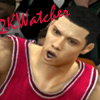
And him in game (i did put tattoos on his arms too)


Image

I did take my about 30 minutes to do him. Most of the time i can do it faster. Just need practice.
Image
User avatar
pierralban
 
Posts: 539
Joined: Tue Feb 24, 2004 8:50 am
Location: Paris, France

Re: Creating fictional CF without modifying the headshape

Postby julsnice on Wed May 29, 2013 6:54 am

Thanx for the tutorial!
julsnice
 
Posts: 87
Joined: Mon Mar 25, 2013 1:46 am

Re: Creating fictional CF without modifying the headshape

Postby zilch27 on Fri Aug 02, 2013 6:43 pm

thank you very much... :D
zilch27
 
Posts: 29
Joined: Fri Aug 02, 2013 10:42 am

Re: Creating fictional CF without modifying the headshape

Postby 2KWatcher on Thu Aug 15, 2013 11:28 am

can u please make a tutorial on how to change skin color as well? it's actually really tough for me..
User avatar
2KWatcher
 
Posts: 112
Joined: Fri Aug 17, 2012 11:00 am

Re: Creating fictional CF without modifying the headshape

Postby A_Armella on Tue Sep 24, 2013 3:24 am

Changing skin tones:

    Open up the cyberface image in photo editing program of your choice ( I use Corel PaintShop pro x4).
    What I like to do is first duplicate the image, just for ease of comparing between the original and the edit. Or in case I need to start over, to me it's easier than hitting undo a bunch of times.

    Next I'll create additional layers of any sections I don’t want the changes to apply to, like the hair and facial hair.

    For editing skin tone, my tool of choice is the RGB adjustment tool. You can also use hue/saturation adjustment tool for some small final adjustments. Note that dropping RGB values up or down equally tends to keep a similar color just lighter or darker. So for example drop R value, G value and B value all 15. This is a good starting point, then tweak in small increments to get the skin tone of choice.

    Finally use the eraser tool with a low opacity to blend in the layers you separated earlier. Done!

Here's a quick guide:

Image

Like I mentioned, I use Corel PaintShop Pro x4 but I'm sure photoshop and GIMP have all the same tools. Hope that helps
Follow me on Twitter @A_Armella for my latest mod releases
A_Armella
 
Posts: 60
Joined: Fri Jul 12, 2013 1:31 pm


Return to NBA 2K13 Tutorials & FAQs

Who is online

Users browsing this forum: No registered users and 3 guests